I get asked now and again if it is difficult to crack a whip. My answer is no and yes. By that I mean that accomplishing a basic crack is quite simple when you understand the movements, but there are also many types of cracks that are much more difficult to master and even I can't do all of them yet, or all that well.
On that note, I shot this clip the other day of my seven year old son, Elijah, as he cracked his bullwhip. The whip he's using is his three foot electric blue and neon orange paracord bullwhip. I was duly impressed with his improvement. The crack he is performing is the forward crack or the circus crack.
Happy cracking,
~Ryan
http://www.happycracking.com/
Tuesday, December 28, 2010
Wednesday, December 22, 2010
How to Lose Weight With a Bullwhip

Overview
A bullwhip is a tightly woven cord attached to a handle and is traditionally used for steering animals on a ranch or farm; however, fitness enthusiasts have found another use for bullwhips. The art of bull whipping requires exceptional coordination and requires strength in the arms, shoulders, back and core. With practice, bullwhip training can be an entertaining alternative to traditional forms of cardiovascular exercise. Exercise with the bullwhip can help you burn the calories it takes to lose weight.
Step 1
Practice your technique with the bullwhip. There are three basic whip cracking motions: the forward crack, the overhead crack and the sidearm crack. Bullwhipping for exercise requires fast motions to get your heart rate up.
Step 2
Wear safety goggles, durable jeans, a long-sleeved durable top and gloves. These items will protect the body from various injuries in case the whip motion goes awry when trying to bullwhip for exercise.
Step 3
Start with a warm-up before you begin whipping. You will be utilizing your arms, shoulders, back and core. Five minutes of jogging followed by arms circles, trunks twists and squats should sufficiently warm up your body for bullwhipping.
Step 4
Start bullwhipping by beginning with one technique and performing the move slowly. Gradually increase your speed until you are performing that particular technique quickly.
Step 5
Switch to another technique after you have reached maximal speed with the previous technique. Repeat this process for each of the three techniques, twice.
Step 6
Complete your cycling through the three techniques and then break out into a bullwhipping "freestyle." This means stringing together the three techniques so that you move quickly from one technique to the next without repeating the same technique twice in a row.
Step 7
Continue to "free style" until you have completed at least 30 minutes of bull whipping. Depending on how vigorously you are whipping, you can burn anywhere from 150 to 200 calories per half hour.
Sounds like fun and an interesting workout idea. Happy cracking,
~Ryan
http://www.happycracking.com/
Thursday, December 9, 2010
The Bumble Bee
I finished this whip this week and thought it looked like a bumble bee...

I would imagine that it has a good sting to it. I truly enjoy cracking these shorter whips. They work well for fast cracking routines and are just easy to tote around with me.
 This shot gave me some good close up resolution. I'm not much of a photographer so I appreciate it when I get a shot like this that shows good detail.
Not much to blog about at the present time. I'm hoping to shoot some better "how to crack" videos over the Christmas break. The more I look at the ones that I have created the more I think they look lame. We'll see how it goes. If you're planning to order a whip I'd encourage you to do it fairly soon. My plaiting claendar is filling up quickly and I'm already into January. At the present time I may only have time for one, possibly two more oders for January and will be looking forward to February. I'll be out of town for a week during that time and may not have the freedom to work on whips.
Well I hope you are enjoying your cracking. Our weather here may be turning ugly soon - thankfully I have several nylon whips to play with that won't be affected by the weather ;)
~Ryan
http://www.happycracking.com/

I would imagine that it has a good sting to it. I truly enjoy cracking these shorter whips. They work well for fast cracking routines and are just easy to tote around with me.

Not much to blog about at the present time. I'm hoping to shoot some better "how to crack" videos over the Christmas break. The more I look at the ones that I have created the more I think they look lame. We'll see how it goes. If you're planning to order a whip I'd encourage you to do it fairly soon. My plaiting claendar is filling up quickly and I'm already into January. At the present time I may only have time for one, possibly two more oders for January and will be looking forward to February. I'll be out of town for a week during that time and may not have the freedom to work on whips.
Well I hope you are enjoying your cracking. Our weather here may be turning ugly soon - thankfully I have several nylon whips to play with that won't be affected by the weather ;)
~Ryan
http://www.happycracking.com/
Thursday, December 2, 2010
Got 'Er Done :)
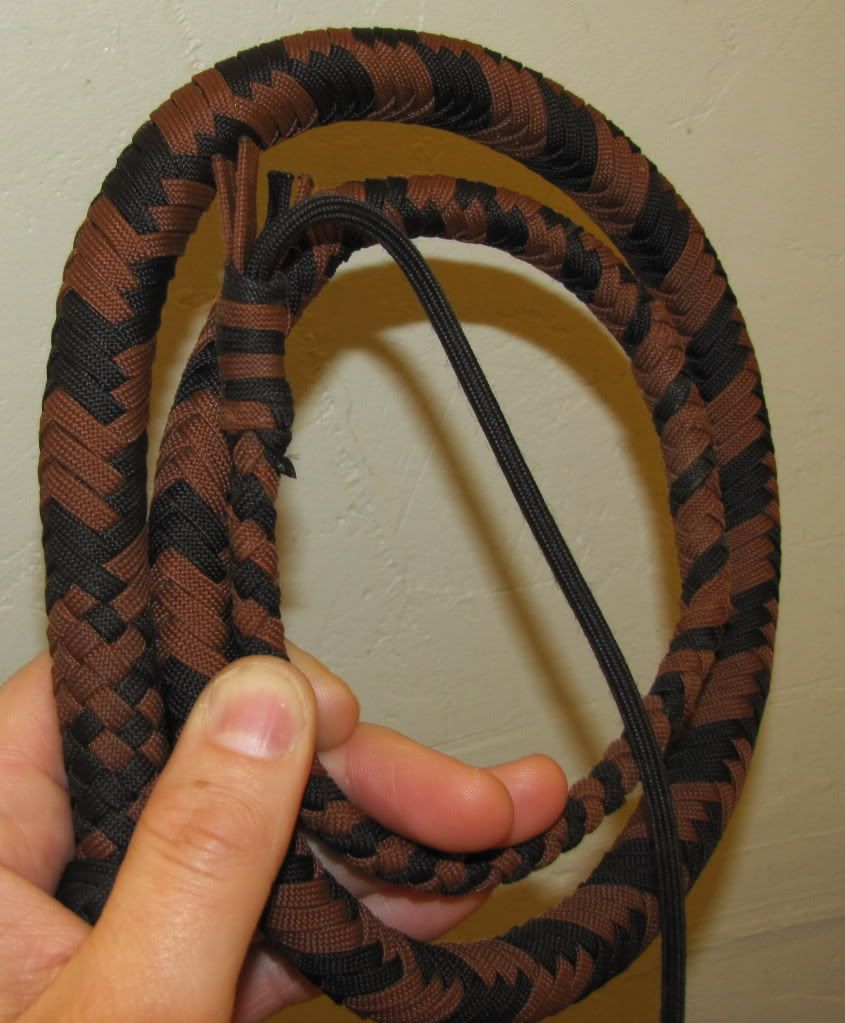
I finished the snakewhip from my earlier post and thought I'd throw out a few pics.


Happy cracking!
~Ryan
http://www.happycracking.com/


Happy cracking!
~Ryan
http://www.happycracking.com/
Busy With Christmas Orders
Well, I'm busily cranking out whips for Christmas. Currently I am booked through about the second week in January, even though I've been able to get out several whips lately rather quickly (well quickly for me that is). I'm currently finishing a three foot snakewhip to send to Canada for a gal who has told me this is her first whip. I think she's going to enjoy the final product. The colors she chose were colonial blue and neon orange - and I have to say I really like this color combo. Here are a couple of pics of the whip in progress...
 This one is not the clearest resolution, but here's the belly being plaited.
 In this shot you can still see the loop where the butt knot will be that I hang the whip by as I plait it and the five strands of paracord on the other end that I'll tie the transtion hitch with. I took this one outside in the sunlight with my iPhone.
Anyway, I just thought I'd write a quick update. Feel free to contact me with questions about my whips, whips in general, or about ordering. Have a wonderful Christmas season.
~Ryan
http://www.happycracking.com/


Anyway, I just thought I'd write a quick update. Feel free to contact me with questions about my whips, whips in general, or about ordering. Have a wonderful Christmas season.
~Ryan
http://www.happycracking.com/
Friday, November 12, 2010
How to Crack a Whip: The Reverse Circus Crack
The Reverse Circus Crack or the Reverse Cattleman's Crack
This crack is accomplished in much the same way as the regular Circus Crack, only in reverse.
Happy cracking!
~Ryan
http://www.happycracking.com/
This crack is accomplished in much the same way as the regular Circus Crack, only in reverse.
- Begin with the whip down or in front of you and your arm down straight by your side (the 6 o’clock position).
- In a smooth motion bring the whip up behind you and over your shoulder. Your arm should stop around the 12 o’clock position, yet allowing the whip to continue forward in front of you.
- When the whip is point straight ahead of you - the 3 o’clock position or even slightly down, say 4 or 5 o’clock (note that your arm is still in the straight up 12 o’clock position) – bring your arm quickly back to the 9 o’clock position and on down to 6 o’clock.
Happy cracking!
~Ryan
http://www.happycracking.com/
Wednesday, November 10, 2010
Just Working on Some Whips
With Christmas coming I have several orders on the docket. I just tonight finished an order for a purple and black Snapdragon. I had a dickens of a time getting the purple cord. It took a bit of work to find a store that had it in stock and then when my package arrived in the mail it was lacking the purple part of my order, which was the whole reason for placing an order with that company - yeah!!! Oh well, my customer was very gracious and patient with me. Anyway here it is.

I'm pleased with how this one turned out. It's got a good little "pop" to it. I hope my customer is pleased as well.
There's still time for a few more Christmas orders. Contact me if I can help you get the whip you're looking for.
Happy cracking,
~Ryan
http://www.happycracking.com/

I'm pleased with how this one turned out. It's got a good little "pop" to it. I hope my customer is pleased as well.
There's still time for a few more Christmas orders. Contact me if I can help you get the whip you're looking for.
Happy cracking,
~Ryan
http://www.happycracking.com/
Thursday, September 30, 2010
Rock Climbing

- Static rope(s)
- One for rappelling
- One for Yo-yo runner
- Dymanic rope(s)
- Prusik slings
- Free carabiners
- Locking carabiners
- Friction devices
- Figure 8s
- SBG
- ATC
- Rope pads
- Webbing (anchors & harnesses)
- Harnesses
- Tarp
- Wasp spray
- 1st aid kit
- TP
- Knife/multi-tool
- Camera
- Extra batteries
- Lunch
- Snacks
- $
- Drinks (i.e. water)
- Cell phone
- GPS
- Comfy clothes
- Hat
- Whips :)
~Ryan
www.happycracking.com
Sunday, September 19, 2010
Bullwhip up for Auction
I just listed a 4 foot bullwhip in imperial red and black on ebay (click here to see the auction). I'm quite pleased with how it turned out, and I have to say that I was really tempted to hang on to this one. But I made it to make a bit of cash for Christmas so I better let it go. Here are some pics...
.JPG)
.JPG)
.JPG)
If I don't have any bids and you want to purchase it, then just send me an email and I'll sell it to you (ryan@happycracking.com).
Happy cracking,
~Ryan
www.happycracking.com
.JPG)
.JPG)
.JPG)
If I don't have any bids and you want to purchase it, then just send me an email and I'll sell it to you (ryan@happycracking.com).
Happy cracking,
~Ryan
www.happycracking.com
Monday, September 13, 2010
How Much Space Do I Need To Crack A Whip?
As you are considering your space requirements remember that a 6-foot whip is only measuring the length of the handle and thong - the fall and the cracker can add another 2 to 3 feet - so a 6 foot whip may in actuality be around 9 feet long. As you make your space measurements figure double the length of the overall whip for the diameter of a circle with your body as the center point - as well as add around 4 feet to account for your body and arm. If you have low branches or low powerlines in your yard take this into consideration.
So, a 6-foot bullwhip will probably require at least 22 feet of cracking space for you to stand in the middle of (9+9+4=22).
 I hope this helps as you consider a whip purchase.
Happy Cracking,
~Ryan
http://www.happycracking.com/
So, a 6-foot bullwhip will probably require at least 22 feet of cracking space for you to stand in the middle of (9+9+4=22).

Happy Cracking,
~Ryan
http://www.happycracking.com/
Friday, September 10, 2010
How to Crack a Whip: The Circus Crack
The Circus Crack or the Forward Crack
1. Start with the whip down or preferably behind you and your arm down straight by your side (the 6:00 position). Note – I’m demonstrating with a short 3.5 foot whip; if you use a longer whip it will be better to have the whip stretched out behind you on the ground to begin this crack
2. In a smooth motion bring the whip around in front of you, up and over your shoulder. Your arm should stop around the 12 o’clock position, yet allowing the whip to continue on behind you.
3. When the whip is pointing back behind you – at around the 9 o’clock position or even pointing down toward the ground (your arm is still around 12 o’clock) – bring your arm quickly forward to the 3 o’clock position. The whip is traveling on a horizontal plane beside you and when you change its direction here it is forming the critical loop that will travel down the whip ending in the sonic boom.
4. One thing that I have seen that seems to help with this crack with new whip crackers is to practice the motions WITHOUT trying to crack the whip. Many people simply try too hard, so just try to get the motion down and it will often crack without you intending for it to happen.
~Ryan
http://www.happycracking.com/
Saturday, August 21, 2010
Bullwhip Pictures
I wanted to try taking some more picturesque photos of a new whip I made. This six-foot, twelve-plait bullwhip made in black and electric blue paracord is headed to a customer in Australia. I want to add one or two of these pics to my website (www.happypcracking.com). If you have a minute, let me know which one you like best.


Take care and happy cracking,
~Ryan
www.happycracking.com


Take care and happy cracking,
~Ryan
www.happycracking.com
Friday, July 23, 2010
New Whip Designs
.JPG)
I have also begun adding the transitional turk's head knot to some of my bullwhips - at the point where the handle and thong meet. I had not really wanted to add this knot for a couple of reasons: 1. the fear that they might come undone, and 2. I don't like tying these cursed turk's head knots and since they are merely cosmetic why bother?!? But, they do look better nonetheless with the knot so it is now an option on my website. The whip pictured below is a 6-foot, 12-plait bullwhip in black nylon paracord.


The other thing that I tried for the first time was adding a second color to the butt knot. I made this 3.5 foot snakewhip (Pocket Rattler) in black and colonial blue for my daughter.
a.jpg)
a.jpg)
Let me know if I can custom make you a nylon whip. Have fun and happy cracking!
~ Ryan
Friday, June 11, 2010
Father's Day Whips
I just finished a pair of whips in time for a friend to give them to her husband for Father's Day. He's seen me out cracking my whips and thinks it looks like fun. Now I guess there'll be at least two whip-geeks in the neighborhood.
This whip is a 6 foot 12 Plait Bullwhip in all black. I recently changed how I load the core of my whips - having moved from the beaded chain to using bb's. I really like the little bit of extra weight and the smoothness of the the whip's flow.
.jpg)
.JPG)
a.jpg)
Well, that's all for now. Take care and happy cracking!
~Ryan
Saturday, June 5, 2010
Pair of Mini Bullwhips
One of the types of nylon whips I make are what I call "Snapdragons." These are very tiny whips, and usually they are snakewhips. The pair of whips below were a special order. He asked for a pair of black and white Snapdragons with 6 inch handles and extending the length of the whips to 28 inches (from butt to end of fall).

Also on these particular Snapdragons I made the falls a bit longer so that the customer could shorten the length if he so desired. I took them out for a few test cracks and they performed quite well.
Typically, my other Snapdragons look like this:
.JPG)
Take care and happy cracking,
~Ryan
Sunday, April 18, 2010
5 Foot Bullwhip
I thought I'd post some pics of a new 5 foot black and grey bullwhip that I have up for ebay auction.
.JPG)
+crop2.jpg)
.JPG)
This is a 5-foot, 12-plait, paracord bullwhip in black and grey with a 5-inch-long-handle. If you are interested in purchasing this whip I'll sell it to you for the opening bid ($79) if there are no bids on it yet (that's $6 off the regular price). Just send me a message and I'll pull the whip off of ebay and send you a Paypal invoice.
Happy cracking,
~Ryan
http://www.happycracking.com/
.JPG)
+crop2.jpg)
.JPG)
This is a 5-foot, 12-plait, paracord bullwhip in black and grey with a 5-inch-long-handle. If you are interested in purchasing this whip I'll sell it to you for the opening bid ($79) if there are no bids on it yet (that's $6 off the regular price). Just send me a message and I'll pull the whip off of ebay and send you a Paypal invoice.
Happy cracking,
~Ryan
http://www.happycracking.com/
Thursday, March 25, 2010
Three Foot Bullwhip Cracking
Here's a quick demonstration video of a three foot nylon bullwhip. I made this to show a customer a bit of how one of these little bulls will handle.
And here's a pic of the whip itself:

Happy cracking,
~Ryan
http://www.happycracking.com/
And here's a pic of the whip itself:

Happy cracking,
~Ryan
http://www.happycracking.com/
Sunday, March 21, 2010
Will Nylon Whips Hold Up???

Hi again!
I'm looking for some information about whips in general and for some advice. Sitting in front of me I have two whips. Both are incredibly cheap, one is made of nylon and the other one is made of leather with what seems to be a cotton filler (it's poking through in places). The nylon whip seems to have no filler at all (it's limp and feels empty). I'm sure your whips are high quality, so please don't take offense to my next question. How does the quality of your whips (and all nylon whips in general) stack up against something like a leather or kangaroo hide whip? How long will one of your nylon whips last? The two I have seem to be on their last leg and it's only been a few days. The fall on the nylon one is starting to fall apart already. In the grand scheme of things I know that what you offer is priced very fairly, especially when I've seen leather and kangaroo hide whips go for as much as $200 or more, but before I spend $95 on a whip I need to know it'll last me a little longer than the past two have, at least through my beginner stage and then some. Once again I thank you for your time. God bless and take care.
Here is what I wrote him...
Nice to hear from you again. When I first started getting into whips in 2008 I also bought some less expensive whips. My first was from a local farmers co-op, an eight foot leather whip. It would crack a bit but I had no idea what a difference a quality whip would make. It too had a cheap core - hemp rope or something - that broke by the fall knot and now sticks out. I've since heard the saying from Australia that goes, "a whip is like a man - no guts, no good" or something like that. My second whip I tried purchasing one from ebay, a ten footer from ****. He had good ratings and the price for a leather whip seemed great. It too was junk. Very hard to crack and the core seemed to be some sort of plastic, like a plastic trash bag.Here are the pics of the whips I sent him:
As far a comparing leather and nylon - this seems to largely be personal preference. I love my kangaroo whip, but find that I use my nylon whips even more. My six foot nylon is a bit lighter and I don't have to "worry" about it as much. I can use it in the morning dew, after a light rain, or in the snow. In short, a well made nylon whip should serve you as well as a well made leather one.
I don't know what your whip was made of but a nylon paracord whip can take a lot of use and even abuse and still work great for many years. There are some cheaper nylons that I don't think would hold up very well. Paracord is the type of stuff they designed to use with parachutes, so you know it has to be strong. This being said it is still not a good idea to crack on pavement or gravel or any similar surface. These surfaces will eventually tear up the whips as they hit and brush against them. It is best to practice on the grass, on carpet, or on a smooth floor like in a gymnasium. I have a little "Pocket Rattler" - a three foot snakewhp - that I take with me almost everywhere and I crack it a lot. I take it on walks with my wife (although she wishes I'd leave it at home), on hikes in the woods, to work, to the park with my kids - I either roll it up and stick it in my pocket or bring it in a bag. I've had this whip for, I think, a little over a year. It looks a bit worn close up but it works as well today as it did when I first made it. The only thing I have replaced or repaired on it are the crackers (which is the same for all whips).
In fact I just took some pics, here they are:
http://s652.photobucket.com/albums/uu242/gsolideogloria/Whip%20stuff/?action=view¤t=YearOldSnakewhip1.jpg
http://s652.photobucket.com/albums/uu242/gsolideogloria/Whip%20stuff/?action=view¤t=YearOldSnakewhip2.jpg
http://s652.photobucket.com/albums/uu242/gsolideogloria/Whip%20stuff/?action=view¤t=YearOldSnakewhip3.jpg
You'll notice the stiffness as well as the natural bend. Whips crack best when cracking with their natural curves.
I hope this helps. Take care and happy cracking,
Ryan
This one above shows the wear and tear up close. As you may notice it is still in great shape - and this is after a year of regular cracking.
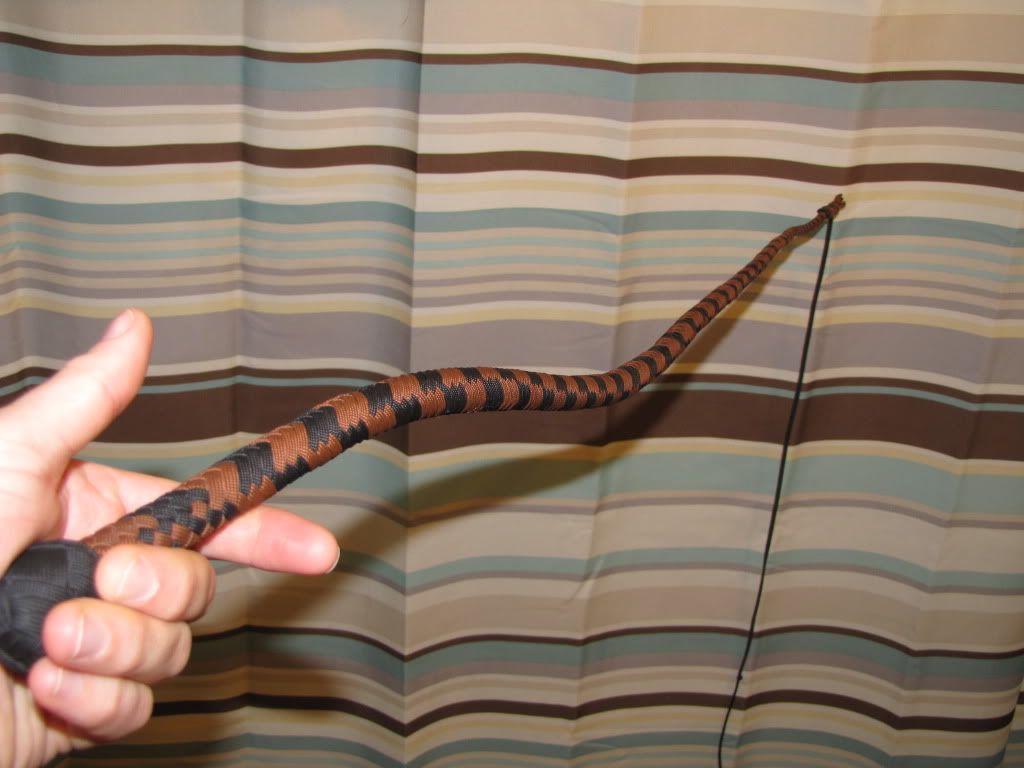
This above picture shows the stiffness of the whip in one direction. This is not an action shot but me holding the whip still. It is not too stiff as can be seen in the photo below.
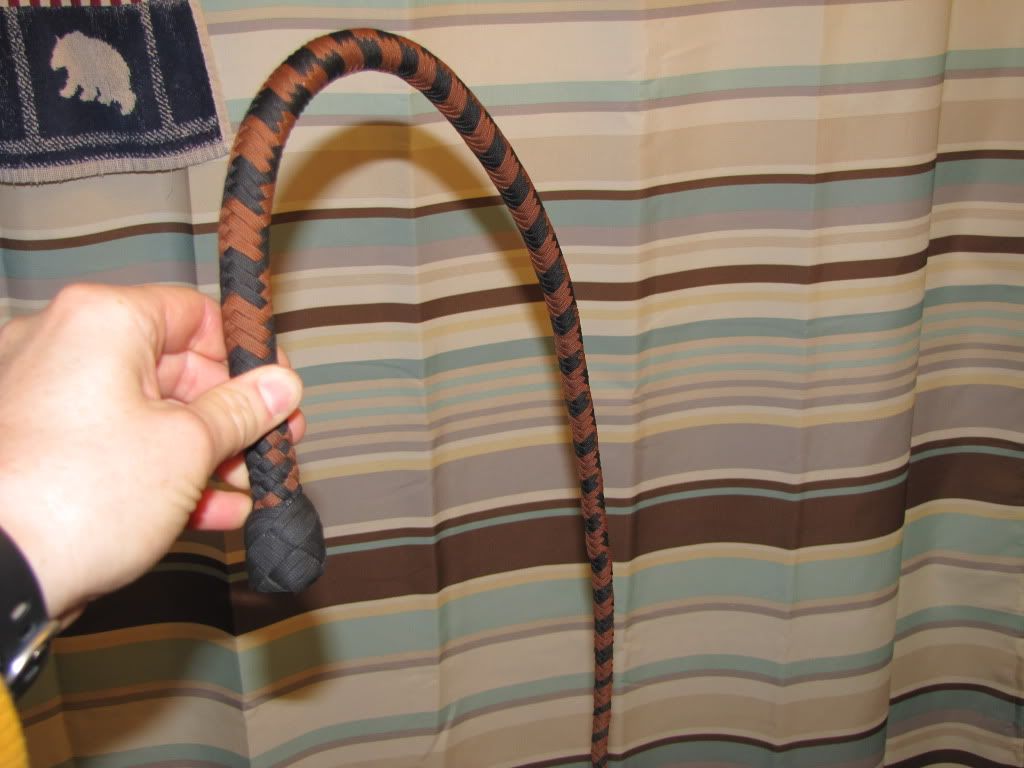
A good whip has a natural curve to it, a way it wants to hang. The whip wants to roll along this curl. The curl is caused by the bolster inside the whip, called the belly - as a consequence, the resulting curve also is called "the belly." The belly is the inside part of the curve - the outside part of the curve is called "the spine."Well, I hope this was informative. Take care and happy cracking.
Cracking with the belly lets you work with the whip. A move is more flowing, more graceful...With this form, you can do more sensitive work, less percussive. The whip wantes to unroll along its curve. This is a relatively effortless crack, since it "wants" to roll along this line.
~Ryan
http://www.happycracking.com/
Saturday, March 13, 2010
Snakewhip on Sale
.JPG)
This whip is a 3-foot, 12-plait snakewhip. It sports a weighted core about half the length of the whip and is topped off with a turk's head butt knot. The 'handle' area has a short reinforcement to add a bit of 'springyness' to its cracking.
Scroll down on my blog to see this whip being made.
Here's a YouTube video of me cracking one of my 3-footers:
.JPG)
Click here to see the auction. In fact if there are no bids on this whip I will sell it to you for my starting price of $58 plus $9 shipping. This is discounted from my regular price of $62. Send me an email through my website and I'll pull it off ebay and get it out to you. Let me know if you have any questions. I'd be happy to help you out.
Take care and happy cracking,
~Ryan
Thursday, March 4, 2010
Why Spend That Much Money For A Whip?!?

Maybe you've thought this or heard someone else say something similar. I know, because that's exactly what I thought when I first started getting into whip-cracking. In fact I went down to my local co-op and picked up that very whip. I worked on cracking it and was able to get a few decent noises out of it. This is how I do most things: jump right in first and then begin doing some research.
Well I began researching and quickly realized that there is much more to a whip than I first thought. Like most people I immediately thought of leather whips and not nylon ones. I began wanting to get a good quality leather one - you know, like the ones that Indiana Jones used. I mean, how much could they really be?

The first thing is the name "David Morgan." LOTS of folks want a whip made by the man who made the original Indy whips (even though he doesn't make them himself any more). This jacks up the price a couple of hundred dollars or so. The name aside, it is a quality whip. This means it is made from quality materials by experienced whipmakers.
A quality whip is quite an investment in time and materials. A well made whip will have a weighted, tapered core that is covered by a bolster. Following this there are usually one or two plaited (braided) bellies that cover the core. At some point there there is some reinforcement in the handle area to keep it from getting too floppy. And lastly there is the outer overlay (usually anywhere from eight to sixteen plait). All of this should be made using quality materials or else the whip will simply fall apart with use.
Well, believe it or not, my farmer's co-op whip was not made with this kind of quality. I've been tempted to take it apart and see what really in there but haven't had the heart to do it yet. I can tell there is some kind of hemp rope or something on the inside because it is broken by the fall knot and sticking out of the plaiting. It doesn't crack all that well any more (not that it ever really did in the first place).
Now, I say all that to say this, "You get what you pay for." If you want a quality whip you have to pay for that quality. One of the great advantages of nylon over leather is the cost. You can purchase a quality nylon paracord whip for a fraction of the cost of a comparable leather one. And, in my humble opinion, the nylon whips are going to truly be comparable in quality, function, and durability. A well-made nylon whip will still not be cheap but it will be well worth the investment.
~Ryan
P.s. don't try getting that "too good to be true" leather whip on ebay. "I mean look at all of the positive ratings that the guy has recieved!!!" Yes, I tried it too. The only good thing I can say about it is that I was able to resell it at a loss, making sure I told the guy it was for ornamental purposes only - it was junk for actual cracking. Oh well, live and learn. http://www.happycracking.com/
Monday, March 1, 2010
A True Whip Master
Introducing Anthony De Longis...
This second video also features Anthony De Longis and gives some incredible education on whips and whipcracking.
Keep a cracking! http://www.happycracking.com/
This second video also features Anthony De Longis and gives some incredible education on whips and whipcracking.
Keep a cracking! http://www.happycracking.com/
How to Snag Stuff with a Whip
I found this crazy article on snagging a TV remote with a whip. I thought it was a hoot.

There are few tools that can break the sound barrier while fetching the TV remote. But throw a whip right and its tip can travel 900 mph (producing a sonic boom), then curl back to snare the object of your desire. Anthony De Longis, who coached Harrison Ford for Indiana Jones and the Kingdom of the Crystal Skull, shows us how to lash out.
1. Skip the toys
Look for a 6- to 8-foot-long whip with a braided core. The best are made from kangaroo hide (or maybe paracord - sorry I couldn't resist - Ryan).
2. Take your stance
Imagine you’re straddling railroad tracks. The whip should travel parallel to the rails, and the target should be a bit closer than the length of your whip. Use caution: The tip can cut to bone.
3. Load and lock
Stretch the whip out in front of you, arm extended and pointed at the object. Now yank your hand up to 12 o’clock. The whip will fly over your hand and unravel behind you.
4. Throw down
When you feel a tug, lower your forearm — easy now, let the whip do the work. It’ll roll forward just to the side of your body. As it unfurls, squeeze the handle.
5. Crack and drag
The tip will extend just beyond the target; as it recoils, it’ll wrap itself around the object. Pull the remote toward you slowly. Next lesson: cracking open a beer.
Contributed by Catherine DiBenedetto
You can find the original version here: http://howto.wired.com/wiki/Snag_Stuff_With_a_Whip
Have fun and happy cracking,
Ryan
Friday, February 26, 2010
Three-Footer in Progress, part 3 - The End!
Well I finished my black and yellow Pocket Rattler (3 foot snakewhip) last night. Here are a few more pics of the process. I wrap electric tape just above the diamond plait and then cut away the excess on top.

I tape two small metal discs, i.e. two pennies :), to the top of the whip for a bit of weight. Some whipmakers wrap a lead strip for weight instead of the pennies. This is the beginning of the foundation for the butt knot. The tape is stapled to the whip eight times in different layers.


.JPG)
Happy cracking!
Ryan - http://www.happycracking.com/

I tape two small metal discs, i.e. two pennies :), to the top of the whip for a bit of weight. Some whipmakers wrap a lead strip for weight instead of the pennies. This is the beginning of the foundation for the butt knot. The tape is stapled to the whip eight times in different layers.

When I finish building the foundation I tie the dreaded turk's head knot. When all this is accomplished, the whip is finished! And there was much rejoicing. Yeah.


.JPG)
The pistol is a Ruger P95DC 9mm and the hat is my black "Spirit" fedora made by John Penman.
Happy cracking!
Ryan - http://www.happycracking.com/
Thursday, February 25, 2010
Three-Footer in Progress, part 2
Well I've made some more progress on the black and yellow Pocket Rattler. Here I have added the six strands for the 12 plait finish.

Pocket Rattlers begin with a short section of a diamond plait and then changes over to the regular whip plaiting. The top section will eventually get cut away and then covered by the butt knot.

When you finish plaiting it is important to roll each section to smooth out the plaiting. Here I use a short piece of a 2x4 and roll the whip on the floor.

When I'm finished rolling then I'm ready to attach the fall and tie the fall hitch.

To make the fall I use approximately fifty inches of de-cored paracord. I attach one end to a small crochet needle with a bit of electric tape.

Then at about the midway point I insert the needle into the paracord and work it through.

Here's the finished fall. It's around two feet long and is doubled back into itself. The loop is placed over the end of the whip and then snugged up tight.

After I tie the fall hitch I use a Super Jumbo Perma-Lok Lacing needle to pull the final pass on the knot back through it self.

Here's the finished knot and fall.

More to come. Hopefully I'll get it finished by this weekend. Happy cracking!
Ryan
Subscribe to:
Posts (Atom)